We don’t use our body to get into the pose. We use a pose to get into our body!
The word restorative means restore or rest. Originating its root from therapeutic yoga by B.K.S. Iyenger, this form of Yoga was developed to be practiced without strain or pain/ with minimal physical effort and idle for those recovering from injuries and illness. Yoga does not always need to be dynamic! Restorative yoga is a relaxing yoga with deep, meditative stretches. This form of yoga takes the mindfulness, which is found in all disciplines of yoga, to the next level. The practice of stillness in a pose helps balancing the breath with the body, helping one to move beyond their organic body to an inner subtle layer. Restorative yoga is a challenge for the mind rather than the body in order to cultivate a powerful inner awareness.
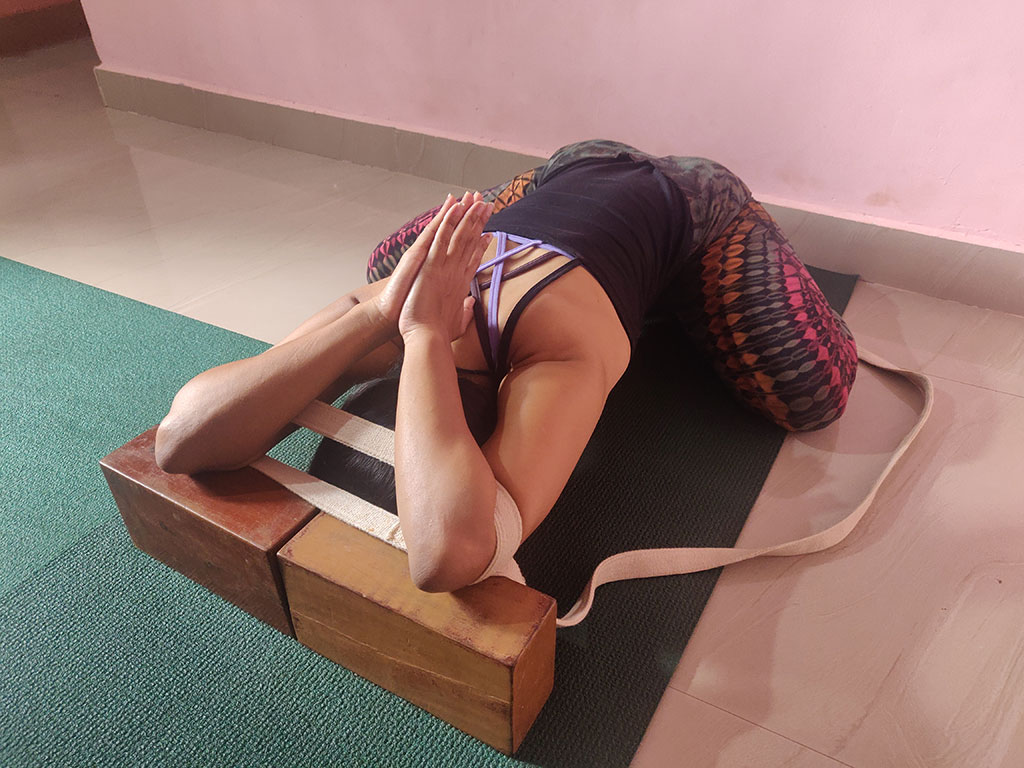
The sequence generally consists of not more then 5-6 poses holding them for approximately 3 to 5 minutes each. Use of props helps the body to be in most comfortable and supported position possible. This helps in stretching the connective tissues around the joints and also stretches the deep rooted muscles. Each organ is separated from the other in order to nourish it with oxygen and bring it to rest. When holding the pose, one tends to move to a passive state. While the body rests in a pose, one gets chance to watch their breath and catch the gaps between each breath. It’s like one is meditating on a pose (which is not an easy task) which helps in creating balance between active and passive side of our being. The relaxation of the mind and body boosts up one’s feeling of compassion and understanding towards one and others. At the end of practice one finds themselves at peace, serenity and restfulness. There are times when your body wants some dynamic action, push and pull, time to grind and time to ebb. But when one finds himself frazzled, one must try restorative yoga instead!
Benefits
• An Idle balance to a hectic and stressful life
• Enhances flexibility
• Relaxes the body and balances the nervous system
• Stimulates immunity
• Lowers down the blood pressure
• Improves the quality of sleep
• Improves digestion
• Brings one into a meditative state
Any pose can be modified into a restorative pose by the proper use of props!
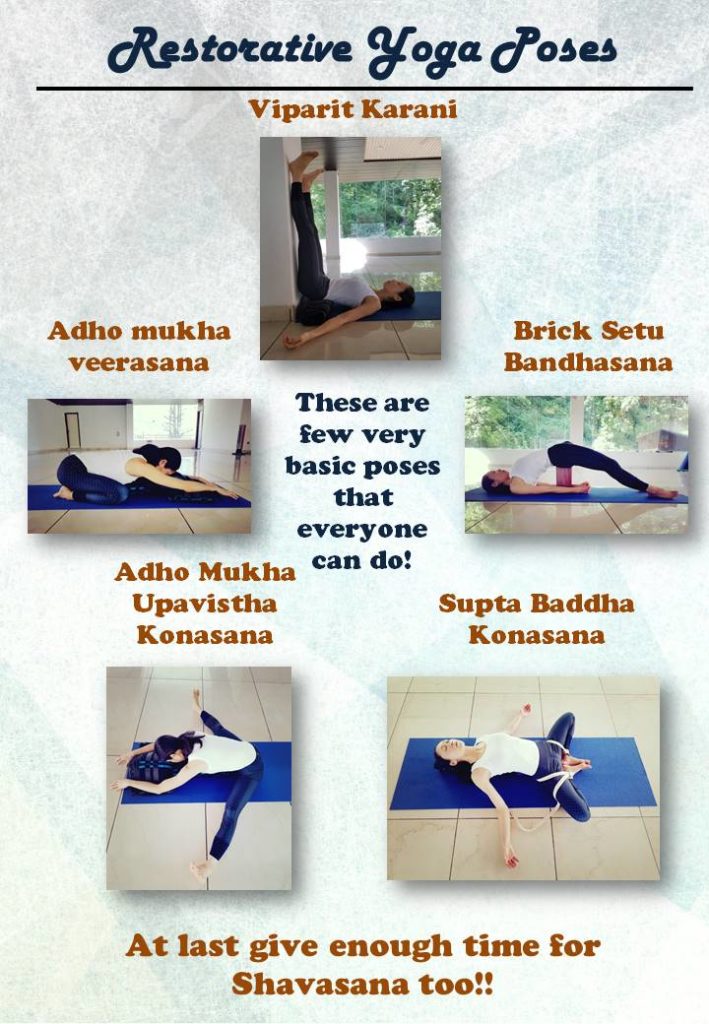
Here are few basic poses that we will discuss in detail:
1. Viparit Karani –
Also called leg-up-the-wall pose. This pose falls under the category of inversions. Viparit means ‘inverted’ and Karani means ‘in action’. Thus, the pose inverts the various typical actions that happen in our body while we sit or stand.
This pose enhances the blood circulation towards the upper body and head. This helps in rebalancing the circulation after performing standing and sitting asanas for a long time. It also helps in reliving the swelling of the muscles in our body.
Technique
1. Place the folded blanket near the wall.
2. Sit on the blanket in such a way that the right part of body touches the wall
3. Slide your legs up towards the wall and the shoulders, neck and back are resting on the mat.
4. Make sure the buttocks are touching the wall while you slide up.
5. Straighten the legs up towards the ceiling.
6. Open your arms at the side and close your eyes. Stay there for 2-5minutes.
7. To come down, bend the knees keeping the feet on the wall. You can slide so that the hips are brought down on
the floor.
8. Roll to the side and sit up.
2. Brick Setu Bandhasana
Also called supported bridge pose. This pose is a medicine for lower back pain, especially for ladies during pregnancy, menstruation, lactation and to cure hormonal imbalances. This pose will not only relax heart, but also cools and soothes your busy brain. It gives you a gentle abdominal stretch and expands your chest. It is also a great way to counter the effects of a day spent sitting.
Technique
1. Lie on the floor, with the knees bent, toes pointing towards the wall.
2. Keeping the head, neck and shoulders on the floor, press the feet on the floor and raise hips/buttocks up.
3. Place a brick vertically under the sacrum, towards the tail-bone.
4. Straighten the legs, one at a time, centre of back of the heel resting on the floor.
5. Open up the chest.
6. Extend the arms along the floor towards the feet.
7. Hold the pose for 2-5 minutes and fully relax into the pose.
8. To come up, bend the knees, lift the hips, remove the brick and lower the buttocks to the floor, then roll
over to the side and sit up.
3. Supta Baddha Konasana –
Also called reclining bound angle pose, it is amongst those few poses that is appropriate to practice after eating. This pose provides a stretch for the inner thighs and opens the hips, enhancing circulation to the vital organs of elimination and reproduction in the lower belly. It also creates a quiet chest opening, especially broadening through the collarbones and the front of the shoulders when the upper back is supported.
Technique
1. Sit in Baddha Konasana by placing feet together and knees falling at the side.
2. Place the bolster or a rolled mat lengthwise behind you.
3. Check that the bolster is straight.
4. Recline back and go flat on your back.
5. Taking the support of the elbows, lie the trunk, shoulders and head down on the mat.
6. Relax your arms at the side or over your head.
7. Hold the pose for 2-5 minutes and fully relax into the pose.
8. Release the arms and legs and sit back in Dandasana.
4. Adho Mukha Upavishta Konasana
Also known as Wide Angle Seated Forward Bend, it helps in stimulating abdominal organs and also strengthens the spine. It also helps in calming down the brain.
Technique
1. Sit in Dandasana and spread your legs out wide at a comfortable extent.
2. Place a brick or bolster in front of you.
3. Raise the arms above the head and extend the arms forward, keeping fingertips on the floor. Walk forward with
fingers and at last rest your head on brick or bolster (depending on flexibility).
4. Hold the pose for 2-5 minutes and fully relax into the pose.
5. With the palm support, inhale and raise your head and trunk and come up.
6. Bring the legs together and return to Dandasana.
5. Adho Mukha Veerasana
Also known as Downward Facing Supported Hero pose, it is a deeply relaxing pose. It helps to quiet the mind and calm down the body. It gently stretches the hips, thighs and ankles and helps to relieve some types of back and neck pain.
Technique
1. Kneel on the mat, toes together and knees apart, placing your buttocks on the heel of the foot.
2. Place a bolster or bricks covered with blanket between the knees.
3. Sit onto your shin and then exhale, slowly lay your torso down over the bolster or place the head on the
blanket covering the brick.
4. Arms can be either in front or placed at the sides of the body.
5. Hold the pose for 2-5 minutes and fully relax into the pose.
6. Lift your head and trunk up and come back to the original position.


